

This article explains how to enable broadcast and multicast support on Amazon (AWS) EC2, which is required for certain enterprise applications and protocols.
Contents
- Introduction
- Software used
- Installation guide
- Post installation instructions
- Tests and performance
- Transfer of one large file to establish consistent throughput
- ZMQ Performance, throughput test
- OpenVPN, without encryption
- TIPC - An example of multicast and broadcast in action using n2n
- Summary
Introduction
*Updated Aug 2018*
Broadcast and multicast support is a requirement of many enterprise applications and clustering stacks. However, in our experience, the choice of hosting providers who can effectively execute these networking features is somewhat limited. This means that more expensive co-location is required. It is much the same situation with many cloud providers, who do not provide broadcast and multicast support. Currently, AWS do not officially support broadcast or multicast out of the box, so the only solution if you require instant results is to use another cloud provider, such as Rackspace.
However, as AWS certified consultants, we wanted broadcast and multicast support within the AWS EC2 network as we currently utilise other AWS products and services and wanted to engineer our way out of the problem, so we set about creating our own solution.
Firstly, we're using AWS VPC (Virtual private cloud) instances (any size is supported). To enable Layer 2 communication over the network we are using n2n Peer-to-Peer VPN software which is bound to the internal Ethernet adapter of the AWS VPC instance. As n2n is a secure VPN server it ships by default with encryption and compression. We removed the encryption and compression as it's not required over a AWS VPC connection (Read more about VPC security). For this demonstration we created a VPC with one subnet, in one availability zone. We used four "m1.small" EM2 instances with public IP addresses. Do not forget adjust Security group(s) to only allow access from the internal network, which in our example is: 192.168.100.0/16
Network configuration of VPC Instances
| Server name | Role | IP Address | VPN IP Address |
|---|---|---|---|
| test1 | supernode | 192.168.100.1 | none |
| test2 | VPN client | 192.168.100.2 | 192.168.1.2 |
| test3 | VPN client | 192.168.100.3 | 192.168.1.3 |
| test4 | VPN client | 192.168.100.4 | 192.168.1.4 |
Software used
- Operating system: Ubuntu (16.04 LTS)
- n2n Peer-to-Peer VPN
- ZeroMQ
Installation Guide
Although n2n is available via the official Ubuntu repository, we will instead download the source code, as small tweaks have to be made to disable compression and encryption. In order to checkout the source code, git is required. Once git is installed, proceed to the commands below.
You can use your favorite text editor, but for this demonstration we're using vi, you may substitute with nano or any other
root@test1 $ git checkout https://github.com/ntop/n2n.git .
root@test1 $ cd n2n/n2n_v2
Disable encryption
root@test1 $ vi MakeFileSearch for
N2N_OPTION_AESand change it to
N2N_OPTION_AES=noNow disable compression
root@test1 $ vi n2n.hSearch for
define N2N_COMPRESSION_ENABLED 1Change it to
define N2N_COMPRESSION_ENABLED 0Once the files have been edited, we need to compile n2n by typing the following command from within the n2n folder
root@test1 $ makeOnce make has been successfully run, you will see two binaries, supernode and edge.
supernode is only required on the supernode server, and edge is required on the others.
Compile n2n on every test server in the same way, or simply copy the edge binary to each server.
The supernode which is responsible for introducing new VPN clients and the edge is used to connect. The VPN clients initially discover each other by using the supernode, but after a connection has been established they never directly communicate through the supernode. This allows us to avoid network bottlenecks and to also mitigate the single point of failure which is present in a star architecture VPN network. If the supernode were to fail, the VPN would continue to function, but no new VPN nodes would be able to register. If we wanted a hot standby for redundancy then another EC2 instance with supernode configured, can be started up using standard AWS failover over procedures.
Post Installation Instructions
On server test1, start supernode
root@test1 $ sudo ./supernode -l 1200If you haven't blocked access from public Internet traffic to the supernode server, you can achieve this with Iptables by executing the following command
root@test1 $ sudo iptables -I INPUT ! -s 192.168.100.0/16 -m udp -p udp --dport 1200 -j DROPNow on server test2, start the VPN client
root@test2 $ sudo ./edge -l 192.168.100.1:1200 -c Buckhill -a 192.168.1.2Check interface by typing
root@test2 $ ifconfig edge0You should see the following output
edge0     Link encap:Ethernet  HWaddr c6:9b:6f:bf:cb:49
inet addr:192.168.1.2  Bcast:192.168.1.255  Mask:255.255.255.0
inet6 addr: fe80::c49b:6fff:febf:cb49/64 Scope:Link
UP BROADCAST RUNNING MULTICAST  MTU:1400  Metric:1
RX packets:0 errors:0 dropped:0 overruns:0 frame:0
TX packets:5 errors:0 dropped:0 overruns:0 carrier:0
collisions:0 txqueuelen:500
RX bytes:0 (0.0 B)  TX bytes:418 (418.0 B)
On server test3, start the VPN client
root@test3 $ sudo ./edge -l 192.168.100.1:1200 -c Buckhill -a 192.168.1.3Now check VPN connectivity on server test3 by typing
root@test3 $ ping -c 1 192.168.1.2The results should look like this
PING 192.168.1.2 (192.168.1.2) 56(84) bytes of data.
64 bytes from 192.168.1.2: icmp_seq=1 ttl=64 time=0.906 ms

--- 192.168.1.2 ping statistics ---
1 packets transmitted, 1 received, 0% packet loss, time 0ms
rtt min/avg/max/mdev = 0.906/0.906/0.906/0.000 ms
You can now connect as many nodes as required.
Testing and performance
Depending on your network requirements it's important to establish the throughput and overhead created by operating over a VPN. In order to determine this we performed two type of tests, between two nodes over the newly created VPN network.
Transfer of one large file to establish consistent throughput
On test2 server netcat was started in listen mode
root@test2 $ nc -l 5001 > /dev/nullOn test3 server the 1GB file was created and sent over the network to test2
root@test3 $ dd if=/dev/urandom bs=1M count=1000 of=/tmp/big_fileThe results look like this
1000+0 records in
1000+0 records out
1048576000 bytes (1.0 GB) copied, 309.952 s, 3.4 MB/s
root@test3 $ cat if=/tmp/big_file |pv|nc 192.168.1.2 5001
1e+03MB 0:00:25 [38.7MB/s] [                                        ]
If you wish to re-produce our ZeroMQ demonstrations shown below, you will need to install ZeroMQ 4.1 with TIPC support. Due to the complexity of this process, it is outside the scope of this article.
ZMQ Performance, throughput test
The tests used by us are standard ZMQ tests which come built in with libzmq
On server test2 start receiver
root@test2 $ ./local_thr tcp://*:5555 4096 100000For this test we used a 4KB message size, which is bigger than the average request in our own applications. It is above the MTU of the network adapter.
On server test3, start the test
root@test3 $ ./remote_thr tcp://192.168.100.2:5555 4096 100000Reference: http://zeromq.org/results:perf-howto
In order to compare results with another VPN service or product, we performed tests using OpenVPN in a Point 2 Point topology.
OpenVPN, without encryption
From server test2
root@test2 $ sudo openvpn --cipher none --proto udp  --dev tun --comp-lzo --auth none --prng none --mode p2p
--ifconfig 192.168.1.2 192.168.1.3  --port 1194
From server test3
root@test3 $ sudo openvpn --cipher none --proto udp  --dev tun --comp-lzo --auth none --prng none --mode p2p
--ifconfig 192.168.1.3 192.168.1.2  --remote 192.168.100.2 1194
OpenVPN without encryption and compression
From server test 2
root@test2 $ sudo openvpn --cipher none --proto udp  --dev tun --auth none --prng none --mode p2p
--ifconfig 192.168.1.2 192.168.1.3  --port 1194
From server test3
root@test3 $ sudo openvpn --cipher none --proto udp  --dev tun --auth none
--prng none --mode p2p --ifconfig 192.168.1.3 192.168.1.2  --remote 192.168.100.2 1194
Test results
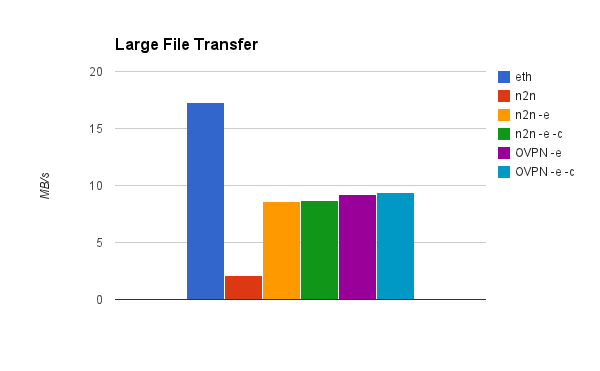
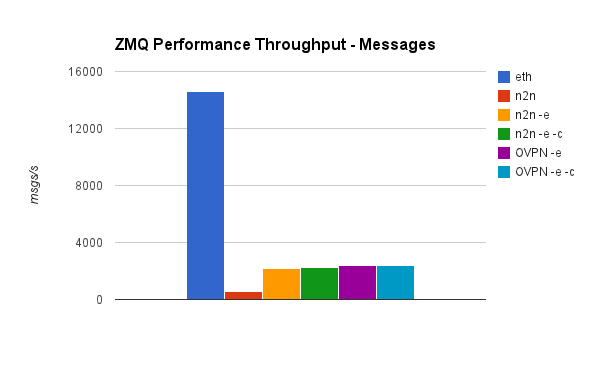
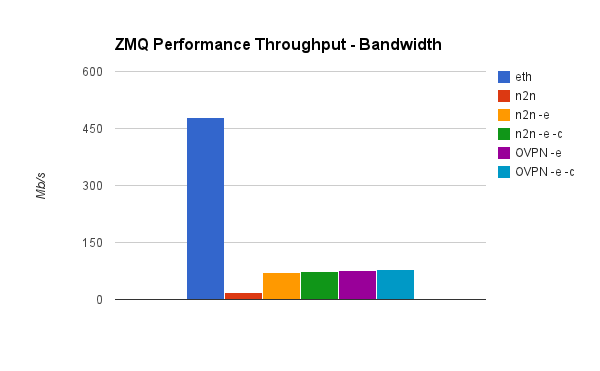
Legend
| Name in graph | Description |
|---|---|
| eth | Ethernet device |
| n2n | n2n vpn with encryption and compression enabled |
| n2n -e | n2n vpn with encryption disabled |
| n2n -e -c | n2n vpn with encryption and compression disabled |
| OVPN -e | OpenVPN with encryption disabled |
| OVPN -e -c | OpenVPN with encryption and compression disabled |
Transfer rate, large file
ZeroMQ messages per second
ZeroMQ bandwidth test
Messages per second, based on message size

We also performed a ZMQ benchmark of the throughput (messages per second), in relation to the messages size.
If the message fits into n2n's MTU, which is 1400, it will not be fragmented. Usually request headers are below 1KB in size, so a higher amount of messages per second can be achieved compared to a 4KB request.
Another conclusion we've drawn is that bandwidth maximum capacity doesn't differ more than 10% in relation to the message size.
An example of multicast and broadcast in action using n2n and TIPC
Our applications make use of the TIPC protocol, which operates on top of Layer 2 packet networks. Using Amazon's EC2 we can't access that network layer. The following demonstrates how a customised n2n VPN solves this problem.
TIPC reference: http://tipc.sourceforge.net
Configuring TIPC nodes is taken from http://hintjens.com/blog:71
For this demonstration we needed one extra server, called test4, which is also a member of the n2n VPN network
Our TIPC configuration
root@test2 $ sudo modprobe tipc && sudo tipc-config -a=1.1.2 -be=eth:edge0root@test3 $ sudo modprobe tipc && sudo tipc-config -a=1.1.3 -be=eth:edge0root@test4 $ sudo modprobe tipc && sudo tipc-config -a=1.1.4 -be=eth:edge0The multicast_demo from TIPC utilities is used for the following demonstration
On servers test2 and test3 run the listener
root@test2 $ ./multicast_demo/server_tipc
Server: port {18888,300,399} created
Server: port {18888,200,299} created
Server: port {18888,100,199} created
Server: port {18888,0,99} created
root@test3 $ ./multicast_demo/server_tipc
Server: port {18888,300,399} created
Server: port {18888,200,299} created
Server: port {18888,100,199} created
Server: port {18888,0,99} created
On the fourth server a message is sent over multicast
root@test4 $ sudo ./multicast_demo/client_tipc
****** TIPC client multicast demo started ******
Client: sending message to {18888,99,100}
Client: sending message to {18888,150,250}
Client: sending message to {18888,200,399}
Client: sending message to {18888,0,399}
Client: sending termination message to {18888,0,399}
****** TIPC client multicast demo finished ******
Both servers (test2 and test3) receive the message and return output which looks like this
Server: port {18888,200,299} received: message to {18888,150,250}
Server: port {18888,100,199} received: message to {18888,99,100}
Server: port {18888,100,199} received: message to {18888,150,250}
Server: port {18888,0,99} received: message to {18888,99,100}
Server: port {18888,300,399} received: message to {18888,200,399}
Server: port {18888,300,399} received: message to {18888,0,399}
Server: port {18888,300,399} terminated
Server: port {18888,200,299} received: message to {18888,200,399}
Server: port {18888,200,299} received: message to {18888,0,399}
Server: port {18888,200,299} terminated
Server: port {18888,100,199} received: message to {18888,0,399}
Server: port {18888,100,199} terminated
Server: port {18888,0,99} received: message to {18888,0,399}
Server: port {18888,0,99} terminated
Summary
Success, a customised n2n VPN set up can be used to effectively operate broadcast and multicast over the AWS EC2 network.
While the average throughput is less than the standard ethernet interface with no VPN for both file transfer and ZMQ, n2n is still comparable with OpenVPN, considered to be a very fast point to point VPN server, but with the added benefit of running a VPN cluster.
Depending on the packet size, we can send between 3000 and 35000 messages per second over ZMQ, and over 80Mbit/second throughput on a small instance.
If more throughput is required, larger instances can be used.
To conclude this article, depending on your exact requirements, using a customised n2n unlocks broadcast and multicast over the EC2 network. If you require more messages per second than you can achieve with EC2, then we recommend Rackspace performance cloud instances which are more expensive but officially support broadcast and multicast.
For our own requirements, the messages per second achieved with n2n provides plenty of excess capacity.
If you have any feedback please comment below.


 Facebook
 Instagram
 LinkedIn